

-
Getting Started (38)

-
Troubleshooting (19)
-
Open Stack (15)
-
Horizon [GUI] (10)
-
Nova [Compute] (13)
-
Neutron [Networking] (22)
- How Can I Check My Network IP Availability?
- How can you isolate project networks connected to a shared router?
- How can I find the time a floating IP was associated or disassociated from an instance?
- Load Balancing Methods
- Multi-tier Router Configuration Within Your IBM Bluemix Private Cloud
- How do I set up DNS records pointing to OpenStack instances?
- Routing Internal Traffic Between Projects
- Add a Specific Fixed Private IP to an Instance
- Configuring DNS for Instances
- Configuring multiple network interfaces for your own cloud images
- How to configure a highly-available IP
- Creating virtual networks on IBM Bluemix Private Cloud
- When creating port failed, how could I do ?
- How Can I See My IPs?
- How Can I Update DNS?
- VPN, VLAN, and Direct Link
- Using BYOFIP Connectivity Between IBM Bluemix Private Cloud and a Customer Site
- Introduction to Load Balancer as a Service (LBaaS)
- Using the CLI to Set Up Security Groups
- IBM Blue Box Network Use Cases
- Where Are the First Two IPs?
-
Glance [Images] (6)
-
Cinder [Block Storage] (13)
-
Keystone [Identity] (8)
-
Heat [Orchestration] (7)
-
Ceilometer [Telemetry] (1)
Creating virtual networks on IBM Bluemix Private Cloud
Managing and maintaining virtual networking in an OpenStack cluster can be challenging. Most likely, you do not need to modify the default configuration of your IBM Bluemix Private Cloud.
IBM Bluemix Private cloud OpenStack environments typically have an Internal and External network: the Internal network houses a customer’s internal IP range on the IBM Bluemix infrastructure, and the External network owns that customer’s floating IP range pool. In most environments, this arrangement is all that’s necessary. Traffic segregation can be handled by security group usage that enforces the data flow between instances and your application. This method is the preferred way of handling such requirements, because it can be fine-tuned to meet your needs and expectations.
Building your own network
So, then, when would you want to create multiple networks? The easiest answer is this: only when you have a requirement for a clean network between instances or applications, such as for some dev/test environments where your production network must be VLAN clean. Other examples may include security and compliance scenarios in which network segregation is absolutely required.
Instructions
Given that your existing infrastructure is set up with VXLAN (which is the standard practice, legacy customers may want to ask their account manager), the process of setting up a new network is as follows:
In the Networks section of your Project, you will see Create Network on the right in Horizon. Click that. On the first popup menu, you will select the network name and the network’s Admin Status (leave it as UP, the default). Pressing Next will take you to the Subnet section, which you need to fill in, as I have done below:
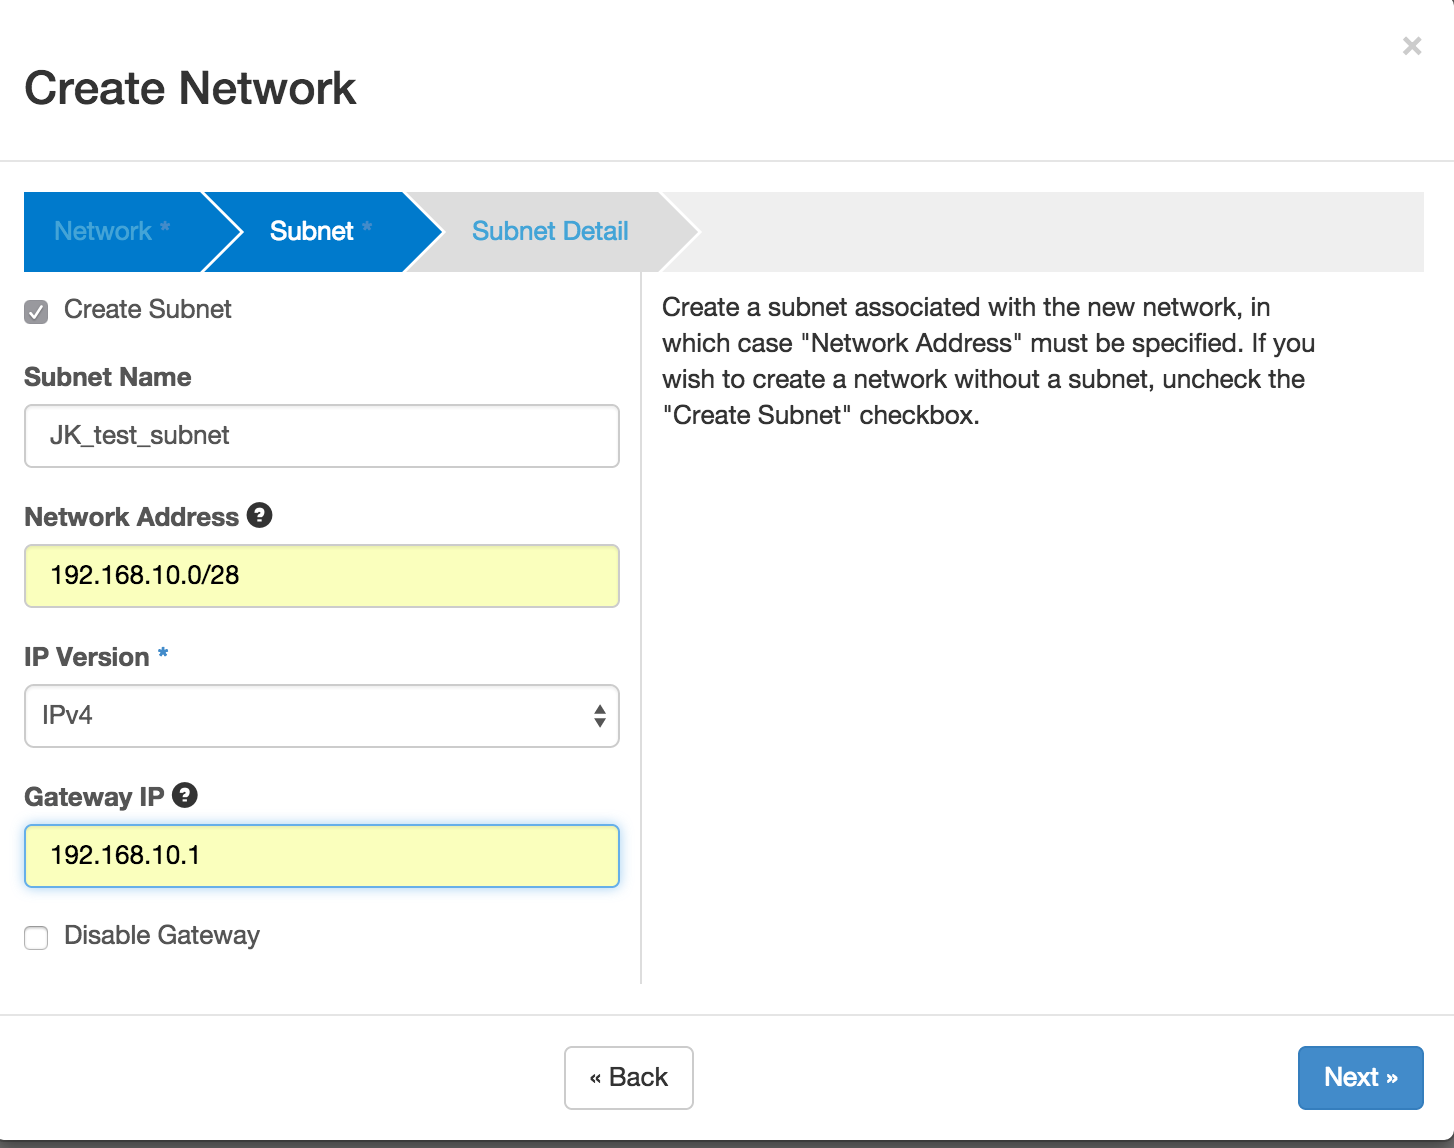
Make sure that your subnet selection is not already in use on your network, as this dual allocation could cause issues and collisions, as well as being a valid subnet.
After completing this section and choosing Next, you’ll be in the Subnet Detail section. Here you can set specific Allocation pools of your IP range, as well as DNS and routing information specific to this addition.
Once you’ve completed these selections, you should see your network listed with the default Internal and External network. We’re almost there! We just need to create a router in order to route the connection between the External network and the one we created.
NOTE: Connecting your new network to the External network will take both a floating IP address from the external network and an IP from your new subnet, because the router requires an address on both interfaces.
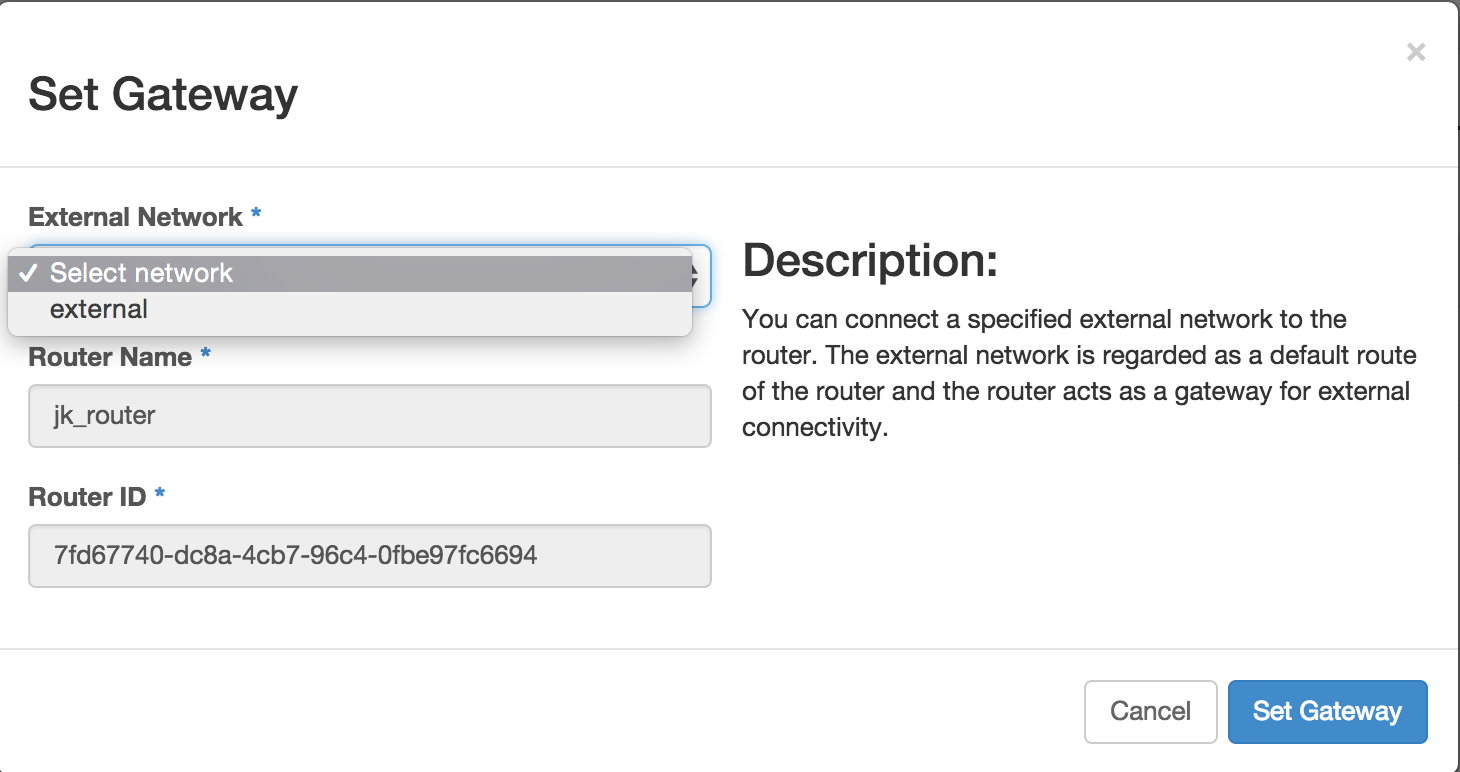
Below Networks on the left in Horizon, you will see the Routers section. Note that a router is necessary only if you intend to bridge that private network into other networks. Since multiple networks can be attached to instances, it is not required to have a bridge here. Your network is private addressing space, and it should be treated as such. You may create “air gapped” networks in this fashion. From there on the right, select Create Router. Once completed (only the name is an option), to the right of your newly created router you will see a dropdown menu, with Set Gateway highlighted. Select that option, and then from the subsequent popup menu, select External (it will be the only option), as shown below:
That previous series of steps attaches our newly-created router to the external network, now we just need to attach it to the network we created. The easiest place to accomplish this action is from the Network Topology section in Horizon, under your Project. Now you will see your router connected to the External network, and if you hover the mouse over it, a popup menu will appear, showing you the option to add an interface, as shown below:
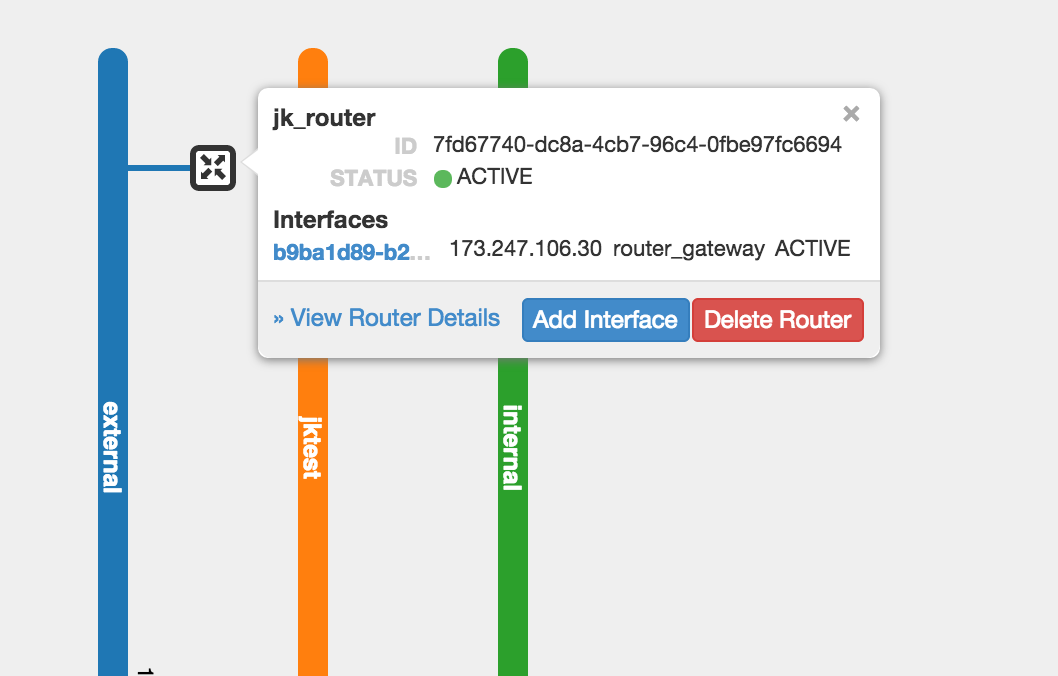
From the Add Interface section, select your network from the Subnet dropdown, and assign it a specific IP address from your range under IP Address. (If you do not pick, the first available one will be chosen.) Click Add Interface, and you should be all set. The Network Topology display should now show you your network bridged to the External network through your router.
Now you should be able to launch an instance using your network, attach a floating IP to the instance, and then reach that instance as normal.