

-
Getting Started (38)

-
Troubleshooting (19)
-
Open Stack (15)
-
Horizon [GUI] (10)
-
Nova [Compute] (13)
-
Neutron [Networking] (22)
-
Glance [Images] (6)
-
Cinder [Block Storage] (13)
- What causes read-only Cinder volumes and how can I fix them?
- Cinder Volume Stuck
- Alternative Method For Block Storage Volume Encryption (using an Ubuntu Guest VM)
- Creating Encrypted Volumes with Cinder is Not Supported
- Managing Block Storage
- Creating a volume with the command line
- Is creating a volume from an instance snapshot supported?
- How Can I Resize a Cinder Volume?
- Which Cinder Volume Types are supported in Cloud Instance?
- How to Move from Ephemeral Disk to Cinder Storage
- Can I enable volume full clone more than copy-on-write clone?
- How to Force a Snapshot on an Attached Volume
- What do I do if the Cinder client returns 'ERROR: Unable to establish connection' message and fails to connect?
-
Keystone [Identity] (8)
-
Heat [Orchestration] (7)
-
Ceilometer [Telemetry] (1)
Managing Block Storage
This article was adapted from the following Bluemix blog post: Managing Cinder Volumes with IBM Bluemix Private Cloud.
IBM Bluemix Private Cloud offers multiple storage models, to address our customers’ unique requirements. If you have workloads such as expandable file systems and data management systems hosted on your Bluemix Private Cloud, block storage may be a good fit for your environment-specific use case. This article explains how to get started with our block storage model.
OpenStack Cinder
Block storage is stand-alone persistent storage that you can attach to and detach from your virtual servers. With block storage, your data persists beyond the lifecycle of the virtual server. For example, if your virtual server stops unexpectedly, your data stored in block storage is safeguarded and remains intact.
Because Bluemix Private Cloud is powered by OpenStack, we offer OpenStack Cinder as the block storage option to our clients. Cinder gives developers the ability to manage their block volumes using both the OpenStack Horizon dashboard UI and standardized OpenStack APIs.
For customers running IBM Bluemix Private Cloud version 3.1.0 and later, Cinder supports multiple backends: its scheduler can locate the right volume types, with flexibility. Cinder block storage is configured to use Ceph clusters, by default.
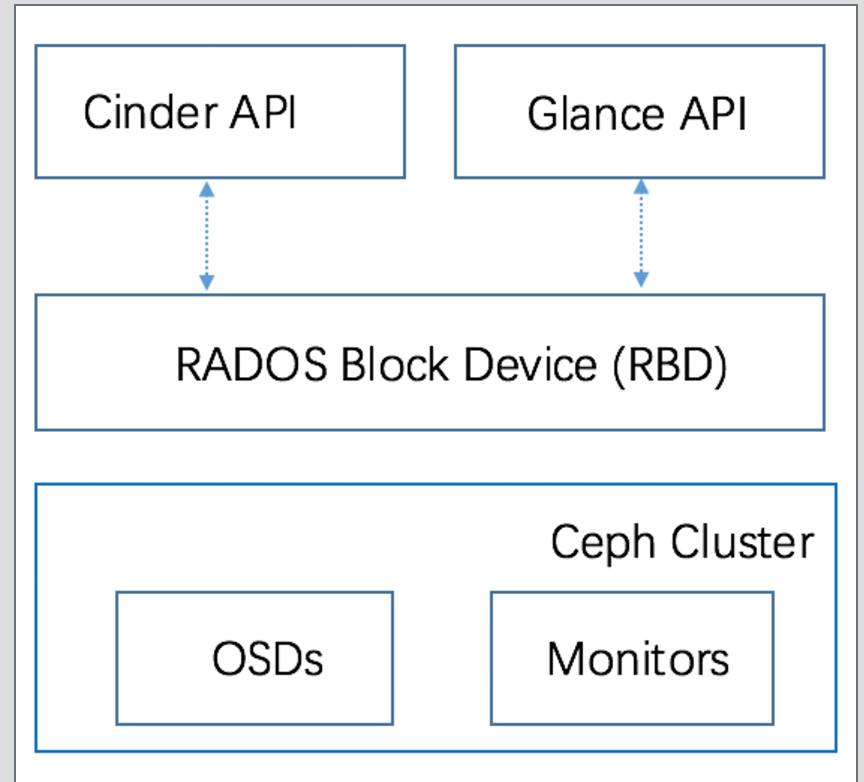
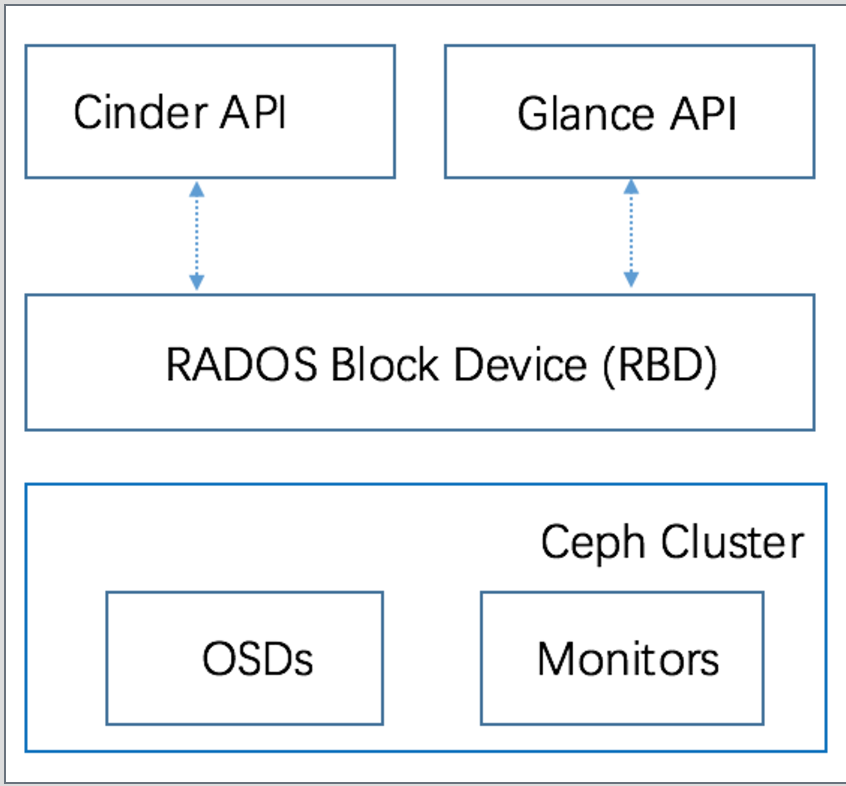
How Ceph works with Bluemix Private Cloud
Ceph is a distributed storage solution based on Reliable Autonomic Distributed Object Store (RADOS), which provides applications with object, block, and file system storage in a single, unified storage cluster.
A Ceph cluster typically is composed of monitor nodes and storage nodes (OSD nodes). The monitor nodes maintain a copy of the cluster map to ensure high availability, and they keep track of the cluster health.
With Ceph, Bluemix Private Cloud provides a block storage option with increased capacity, exceptional performance, and lower cost. According to your specific workload requirements, you can also customize the following node types for your Ceph clusters:
-
An SSD-only option with SSD-only OSD disks and co-located Ceph Journal has the optimal I/O performance. It suits your storage workload expecting high IOPS.
-
A hybrid option with SATA OSD disks and SSD-based Ceph Journal has good IO performance and lower cost, and fits into medium IOPS workloads.
-
A multi-tier option with a mixture of SSD-only and hybrid nodes is ideal for large-scale environments.
After your block storage is configured with the proper multi-backend and multi-tier options, you’re ready to create a Cinder volume, using the OpenStack Horizon dashboard or the OpenStack Cinder client.
Creating a Cinder volume using OpenStack API
To create a volume using the OpenStack client, run the following Cinder command:
$  cinder create <size> --display-name <name> --volume-type <type> \
--image-id <imageid> --availablity-zone <az>
The following commands show examples of how you can customize your newly-created volume for your Bluemix Private Cloud.
- <size>: The size of the volume in gibibytes (GiB).
- <name>: The name of the volume.
- <type>:
CEPH_HYBRIDorCEPH_SSD. You can use thecinder type-listcommand to get a list of available volume types. - <imageid>: Optionally, specify the ID of the image that you want to use for your volume. You can use the
nova image-listcommand to list the existing images. - <az>: Optionally, specify the availability zone in which you want to create the volume. You can use the
cinder availability-zone-listcommand to get a list of availability zones.
For more information on this topic, you can refer to the following document: Creating a volume with the command line.
Creating a Cinder volume with Horizon
To create a block storage volume using Horizon, the OpenStack dashboard, you can get started with the following steps:
-
Log into the Horizon dashboard.
-
Under the Project section, select Compute, then click Volumes. If you have existing volumes, you can view a list of your volumes and their details (such as name, description, size, and status), from the dashboard UI.
Click Create Volume on the upper right portion of the Horizon dashboard. The Create Volume dialog is displayed.

Provide the following details about the volume:
- Volume Name: Type the name of your volume.
- Description: Type a description of your volume.
- Volume Source: No source, empty volume or Image. If you choose an empty volume, an empty volume does not contain a file system or a partition table. If you choose the image option, a new field for Use image as a source displays and you can select the image from the list.
- Type: Ceph_SSD or Ceph_Hybrid.
- Size (GiB): Select the size of the volume in gibibytes(GiB), for example, 1.
- Availability Zone: Choose the availablity zone, for example, nova.
Click Create Volume when complete. You’re now able to attach your Cinder volume to your virtual server.
For more information on this topic, you can refer to the following document: Creating a volume from the Horizon dashboard.
After creating and attaching your Cinder volumes to Virtual Servers, you can easily adjust and expand their volume sizes as your capacity requirements grow. You are also able to detach and re-attach your block volumes to another Virtual Server requiring persistent storage, while your stored data remains safeguarded.
Troubleshooting
openstack volume list –name vs. cinder list –name
If you are a user with a role that is not cloud_admin, the openstack volume list --name command doesn’t function correctly for you. To circumvent this problem, you can let a user with the cloud_admin role filter volumes by name, or you can use the cinder list --name command, which works for any user. We have opened internal defect 374319 for this issue, and we are working with our engineering team on resolving the problem.
publicURL endpoint for volumev2 service not found error when running cinder or openstack volume commands
If you get this error, it is usually because you don’t have any block storage (Cinder volume) nodes in your current cluster. If you’d like to order block storage, please open a ticket requesting it and our sales team will help you get it added.
publicURL endpoint for volumev3 service … not found
This error can happen when you have an earlier version of the volume service in your endpoint list. To resolve this, add export OS_VOLUME_API_VERSION=2 to your RC file.
Why does the total volume size of all the volumes allocated in Cinder not match the raw total from Ceph?
This can happen if you have volumes in Ceph that were deleted but are still in the pool, and other volumes were created from these volumes before they were deleted. The way Ceph works, cloned volumes are copy-on-write child volumes of the volume from which they were cloned, which means that the parent volume must be retained until all of its children (and grand-children, great-grand-children, etc.) are deleted. That being the case, the usage won’t equal the sum of the sizes of currently active volumes.
More information on Ceph copy-on-write layering can be found at: http://docs.ceph.com/docs/hammer/dev/rbd-layering/