

Keystone to Keystone (K2K) Federation on IBM Bluemix Private Cloud
- What is K2K Federation?
- Managing Groups
- Managing Mappings
- Using Horizon
- Using the Python API Libraries
- More Mappings and Groups
What is K2K Federation?
Keystone to Keystone (K2K) federation is a way to use credentials from one Keystone instance for logging in across multiple IBM Bluemix Private Cloud instances. One Bluemix Private Cloud instance is designated as an Identity Provider and other cloud instances are designated as Service Providers. The Identity Provider stores the user’s credentials and asserts to the Service Providers that the user is, in fact, a valid user. The user’s ID and password are never sent to the Service Providers, only assertions from the Identity Provider are sent.
How does K2K work?
The user signs into the Identity Provider, receives a signed SAML assertion from the Identity Provider
and then uses that SAML assertion to authenticate into the Service Providers. The log in process
for handling the SAML flow is handled by the K2K authentication plugin (found in keystoneauth1).
Credentials are managed only on the Identity Provider, and they are accepted by Service Providers through assertions.
If several Bluemix Private clouds have been set up with the K2K feature, one cloud instance is designated as the Identity Provider and the others are designated as Service Providers. Service Providers use mappings to select the user attributes from the Identity Provider that are utilized to map to a local group. Once the user logs in using K2K federation, the user is granted the roles assigned to the group.
By default, a mapping called mapping-for-k2k-federation
is created for the cloud_admin credentials on the Identity Provider by which they are mapped to a local group called cloud_admin. This group has the role cloud_admin access to the demo project.
The flow of setting up K2K federation is as follows:
1. First, manage groups on the Service Provider (Federated users will have the same access rights as the group)
2. Next, manage mappings on the Service Provider (Map remote Identity Provider users to local service provider groups)
Managing Groups
K2K Federation works by federating Identity Provider users to a group on the Service Provider. The group is granted access by assigning that group a role on a project. The available roles are as follows:
project_admin- Theadminrole for the project.cloud_admin- Theadminrole for the cloud instance._member_- A member of a project.heat_stack_owner- An owner for heat stacks.
To use the group commands, a credential source file is required. You’ll need to create a file containing the credentials and replace the tags shown in angle brackets < > with the appropriate information:
#This file is cloud_adminrc
export OS_IDENTITY_API_VERSION=3
export OS_PASSWORD=<cloud_admin password> #Change this
export OS_AUTH_URL=https://<service provider fqdn>:5000/v3
export OS_USERNAME=cloud_admin
export OS_TENANT_NAME=demo
export OS_CACERT=/opt/stack/ssl/openstack.crt
export OS_NO_CACHE=True
After the credential source file is made, you can source the file and use any of the OpenStack commands below to manage groups and roles. Note: These commands run on the Service Provider.
Source the credentials into the environment:
$ source cloud_adminrc
To list groups:
$ openstack group list
To create a group:
$ openstack group create --help
$ openstack group create <new group name here>
To list roles:
$ openstack role list
To list role assignments:
$ openstack role assignment list --name
To list projects:
$ openstack project list
For help looking at adding role assignment:
$ openstack role add --help
To add a role assignment for a group to have a role on a project:
$ openstack role add <role> --project <project> --group <group>
Federated users are mapped into groups on the Service Provider. By default, a group called cloud_admin exists if K2K federation is enabled. This group has the role cloud_admin on the “demo” project.
Here’s the order of operations for granting access for groups:
- First, create or edit the group.
- Then, create or edit the role assignments for groups on projects.
Example 1. Creating a cloud_admin group.
The commands below show how to source a file with the authentication information for the Service Provider cloud_admin user.
$ source cloud_adminrc
$ openstack group list
$ openstack group create cloud_admin --or-show
$ openstack role assignment list --name --group cloud_admin
Next, create the role assignment if it doesn’t exist.
These commands add the role cloud_admin for the group cloud_admin for the “demo” project.
$ openstack role add cloud_admin --group cloud_admin --project demo
$ openstack role assignment list --name --group cloud_admin
After executing the openstack role assignment list command you should see an output similar to this one:
# +-------------+------+---------------------+--------------+--------+-----------+
# | Role        | User | Group               | Project      | Domain | Inherited |
# +-------------+------+---------------------+--------------+--------+-----------+
# | cloud_admin |      | cloud_admin@Default | demo@Default |        | False     |
# +-------------+------+---------------------+--------------+--------+-----------+
Example 2. Creating a group with member access.
The commands below show how to source a file with the authentication information for the Service Provider cloud_admin user.
$ source cloud_adminrc
$ openstack group list
$ openstack group create demo_member_group --or-show
$ openstack role assignment list --name --group demo_member_group
$ openstack role add _member_ --group demo_member_group --project demo
$ openstack role assignment list --name --group demo_member_group
After entering the openstack role assignment list command you should see an output similar to this one:
# +----------+------+---------------------------+--------------+--------+-----------+
# | Role     | User | Group                     | Project      | Domain | Inherited |
# +----------+------+---------------------------+--------------+--------+-----------+
# | _member_ |      | demo_member_group@Default | demo@Default |        | False     |
# +----------+------+---------------------------+--------------+--------+-----------+
Managing Mappings
The cloud_admin user on the Service Provider has access to read and set mappings for K2K federation. Please note that the cloud_admin Service Provider user cannot delete existing mappings or create new mappings.
To use the mapping commands, a v3 credentials source file is required. You’ll create a file containing the credentials and replace the tags in angle brackets < > with the appropriate information:
More information on managing mappings can be found in the OpenStack documentation: http://docs.openstack.org/developer/keystone/mapping_combinations.html http://docs.openstack.org/developer/keystone/federation/federated_identity.html#mapping-combinations
When a user logs on to the Service Provider through K2K federation, using their Identity Provider account, a user account is created locally on the Service Provider. Please note that the user account created during federation is ephemeral. It may be deleted at a later time without warning.
In the default mapping, the cloud_admin on the Identity Provider user is federated, so that a local cloud_admin user
is created in the federated domain. This user is different than the cloud_admin user in the “Default” domain. The
ephemeral cloud_admin user in the federated domain may be deleted in the future.
We need the source file created from the previous section so we can run the following mapping commands:
$ source cloud_adminrc
$ openstack mapping list
$ openstack mapping show mapping-for-k2k-federation
$ openstack mapping show mapping-for-k2k-federation --format json
$ openstack mapping show --help
$ openstack mapping set mapping-for-k2k-federation --rules <mappings file>
The openstack mapping list command shows a list of mappings. It should show the mapping-for-k2k-federation mapping.
The openstack mapping show mapping-for-k2k-federation command shows the details of the given mapping. It should contain a json listing of the rules for the mapping.
The openstack mapping set mapping-for-k2k-federation --rules newmappings.json
command shows how to update and set the mapping-for-k2k-federation mapping.
The mappings file should follow the format given here:
[
   {
      "local": [
        <group>
      ],
      "remote": [
        <condition>
      ]
   }
]
The rules file should contain a list of rules that map the remote users to a group that exists on the Service Provider. The local section contains a rule specifying the group that the remote users should map to. The local group rule is required.
{
  "group": {
    "domain": {
      "name": "Default"
    },
    "name": "cloud_admin"
  }
}
The remote section includes rules that specify which remote users should be allowed access.
{
    "type": "openstack_user",
    "any_one_of": [
        "cloud_admin"]
}
The possible user attributes types that can be given in the remote rules are these:
openstack_user
openstack_user_domain
openstack_roles
openstack_project
openstack_project_domain
The possible actions to filter on remote attributes are:
empty
any_ony_of
not_any_of
blacklist
whitelist
To set the username we can use {0} in the local section to indicate to use a field from the remote section. Then we can additional information to the new federated username. For K2K federation it is important to add some information to indicate which cloud you are using. We can reference the remote section in the local section by index (“{i}”, where i is the index of the remote field), :
[
  {
    "local": [
      {
        "user": {
          "name": "my_cloud/{0}"
        }
      },
               ...
    ],
    "remote": [
      {
        "type": "openstack_user"
      },
               ...
    ]
  }
]
Here are some example scenarios:
Example 1. Mapping the cloud_admin user to a cloud_admin group and setting the username to be my_cloud/cloud_admin in the federated domain. This is the default mapping file:
[
  {
    "local": [
      {
        "user": {
          "name": "my_cloud/{0}"
        }
      },
      {
        "group": {
          "domain": {
            "name": "Default"
          },
          "name": "cloud_admin"
        }
      }
    ],
    "remote": [
      {
        "type": "openstack_user"
      },
      {
        "type": "openstack_user",
        "any_one_of": [
          "cloud_admin"
        ]
      }
    ]
  }
]
Example 2. Member mappings
This example maps users who have the role _member_ on project “demo” on the Identity Provider to a group (demo_member_group from Group Example 2) on the Service Provider. We assume that the demo_member_group is a group on the
Service Provider, with the _member_ role on the “demo” project on the Service Provider.
We are running a series of bash commands to cat the following string into a file and then set the mapping.
$ cat <<EOF > federated_member_mapping.json
[
  {
    "local": [
      {
        "user": {
          "name": "my_cloud/{0}"
        }
      },
      {
        "group": {
          "domain": {
            "name": "Default"
          },
          "name": "demo_member_group"
        }
      }
    ],
    "remote": [
      {
        "type": "openstack_user"
      },
      {
        "type": "openstack_project",
        "any_one_of": [
          "demo"
        ]
      },
      {
        "type": "openstack_roles",
        "any_one_of": [
          "_member_"
        ]
      }
    ]
  }
]
EOF
$ openstack mapping set mapping-for-k2k-federation --rules federated_member_mapping.json
Example 3. Multiple rules
[
  {
    "local": [
      {
        "user": {
          "name": "my_cloud/{0}"
        }
      },
      {
        "group": {
          "domain": {
            "name": "Default"
          },
          "name": "cloud_admin"
        }
      }
    ],
    "remote": [
      {
        "type": "openstack_user"
      },
      {
        "type": "openstack_user",
        "any_one_of": [
          "cloud_admin"
        ]
      }
    ]
  },
  {
    "local": [
      {
        "user": {
          "name": "my_cloud/{0}"
        }
      },
      {
        "group": {
          "domain": {
            "name": "Default"
          },
          "name": "demo_member_group"
        }
      }
    ],
    "remote": [
      {
        "type": "openstack_user"
      },
      {
        "type": "openstack_project",
        "any_one_of": [
          "demo"
        ]
      },
      {
        "type": "openstack_roles",
        "any_one_of": [
          "_member_"
        ]
      }
    ]
  }
]
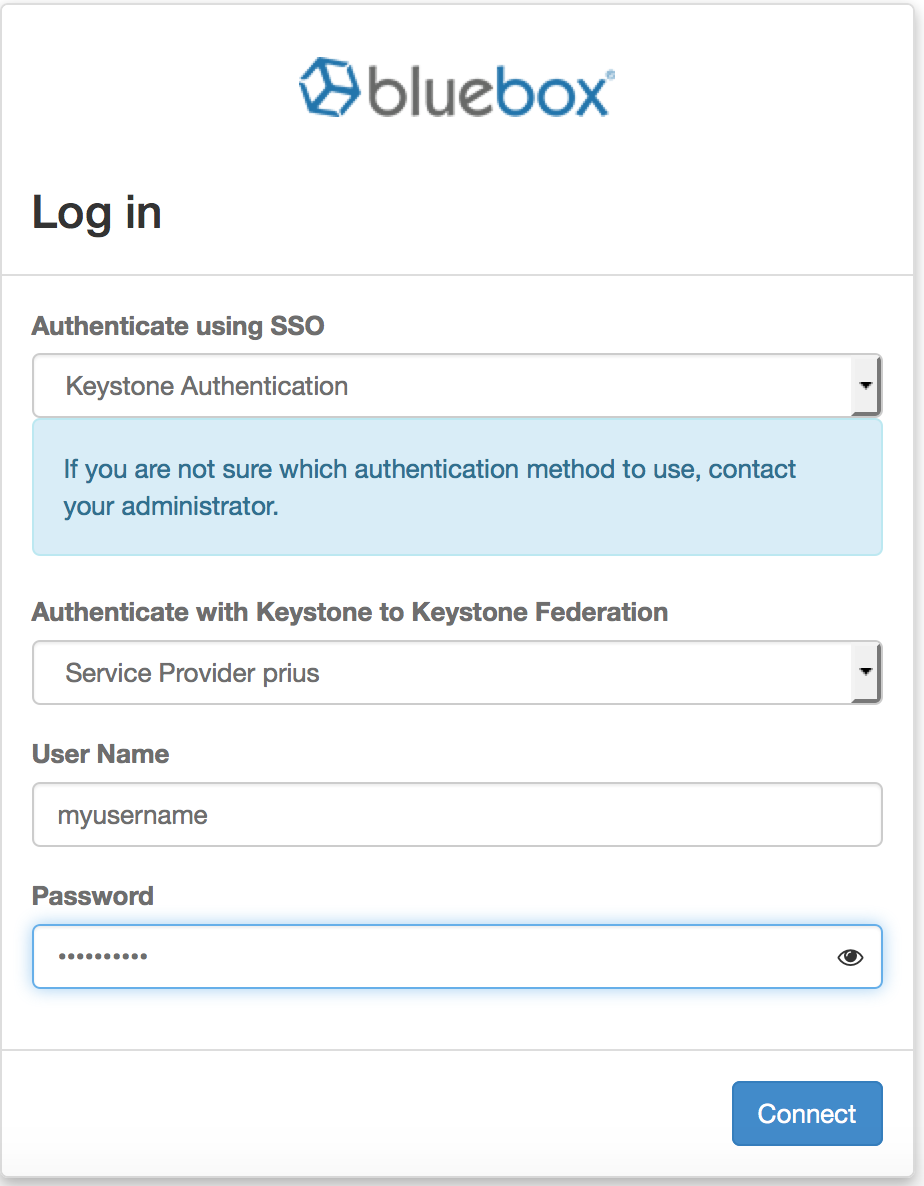
Using Horizon
The OpenStack dashboard on the Identity Provider should have a drop-down menu labeled Authenticate with Keystone to Keystone Federation.
- If you select the Identity Provider option, federation will not be used. The user will be signed into the Identity Provider OpenStack cloud.
- If the Service Provider option is selected, federation is used. The Identity Provider user credential will be federated to the Service Provider.
- To switch between providers, the user will need to log out and re-select the provider.
Please note: The Horizon login screen for K2K for IBM Bluemix Private Cloud 3.0.0 is not a standard OpenStack feature. It may change in future releases.
Using the Python API Libraries
Next, you’ll make a source file which you will use to authenticate using the K2K authentication plugin. The token OS_SERVICE_PROVIDER refers to the Service Provider ID, which you can obtain by running the following command against the Identity Provider:
$ openstack server provider list
Here we can create a source file that will be used by our Python script to list instances on the Service Provider(Sp), by using the cloud_admin credentials from the Identity Provider (IdP).
This source file (federationrc) contains authentication credentials for logging into the Idp, and the Sp target information.
# This file is federationrc
export OS_USERNAME=cloud_admin
export OS_PASSWORD=<cloud admin password>
export OS_AUTH_URL=https://k2kf-idp.open-test.ibmcloud.com:5000/v3
export OS_PROJECT_NAME=demo
export OS_DOMAIN_NAME=Default
export OS_SERVICE_PROVIDER=<service provider id>
You can see the list of Service Providers by running the following commands on the Identity Provider:
$ openstack service provider list
The following code uses the Keystone-to-Keystone auth plugin to get an unscoped token.
This unscoped token is used to get a scoped token, which is then scoped to one of the projects
to which the federated user will have access. Once you have the scoped token, you can list the server instances on the Service Provider.
Create a file called list_servers.py:
#!/usr/bin/python

from keystoneauth1 import session
from keystoneauth1.identity.v3 import Token
from keystoneauth1.identity.v3.k2k import Keystone2Keystone
from keystoneauth1.identity.v3.password import Password
from keystoneclient.v3.client import Client

from novaclient import client
import os

# we get these variables from sourcing a file
OS_AUTH_URL = os.environ.get('OS_AUTH_URL')
OS_USERNAME = os.environ.get('OS_USERNAME')
OS_PASSWORD = os.environ.get('OS_PASSWORD')
OS_PROJECT_NAME = os.environ.get('OS_PROJECT_NAME')
OS_DOMAIN_NAME = os.environ.get('OS_DOMAIN_NAME')
OS_SERVICE_PROVIDER = os.environ.get('OS_SERVICE_PROVIDER')


def get_project_and_federated_session():
    # authenticate to the idp
    idp_auth = Password(auth_url=OS_AUTH_URL,
                        username=OS_USERNAME,
                        password=OS_PASSWORD,
                        user_domain_name=OS_DOMAIN_NAME,
                        project_name=OS_PROJECT_NAME,
                        project_domain_name=OS_DOMAIN_NAME)

    # get unscoped auth using k2k auth plugin
    unscoped_auth = Keystone2Keystone(base_plugin=idp_auth,
                                      service_provider=OS_SERVICE_PROVIDER)

    # get first available project and scoped auth
    sess = session.Session()
    unscoped_access_info = unscoped_auth.get_access(sess)
    unscoped_client = Client(session=sess, auth=unscoped_auth)

    # Get first project
    projects = unscoped_client.federation.projects.list()
    project = projects[0]

    # Create a session with a scoped token for the project
    unscoped_token = unscoped_access_info.auth_token
    scoped_token = Token(auth_url=unscoped_auth.auth_url,
                         token=unscoped_token,
                         project_id=project.id,
                         reauthenticate=False)
    federated_session = session.Session(auth=scoped_token)
    return project, federated_session


def main():
    project, scoped_session = get_project_and_federated_session()
    nova = client.Client(version=2, session=scoped_session)
    print "The servers running on project %s are: " % project.name
    for server in nova.servers.list():
        print server.name

if __name__ == '__main__':
    main()
The python script can be ran by doing the following:
$ source federationrc
$ chmod 700 list_servers.py
$ ./list_servers.py
More Mappings and Groups
Example 1. Heat Users
Currently an issue exists with federated users and with the trustor/trustee feature in Keystone, which prevents
the federated Heat user from delegating their heat_stack_owner role.
Create Heat federation group
Source a file with the authentication info for the Service Provider cloud_admin user: source cloud_adminrc
Here we use the role heat_stack_owner and NOT heat_stack_user
$ openstack group list
$ openstack group create heat_stack_owner_group --or-show
$ openstack role assignment list --name --group heat_stack_owner_group
$ openstack role add heat_stack_owner --group heat_stack_owner_group --project demo
$ openstack role assignment list --name --group heat_stack_owner_group
# +------------------+------+--------------------------------+--------------+--------+-----------+
# | Role             | User | Group                          | Project      | Domain | Inherited |
# +------------------+------+--------------------------------+--------------+--------+-----------+
# | heat_stack_owner |      | heat_stack_owner_group@Default | demo@Default |        | False     |
# +------------------+------+--------------------------------+--------------+--------+-----------+
Create Heat federation mappings
$ cat <<EOF > federated_heat_stack_owner_mapping.json
[
  {
    "local": [
      {
        "user": {
          "name": my_cloud/"{0}"
        }
      },
      {
        "group": {
          "domain": {
            "name": "Default"
          },
          "name": "heat_stack_owner_group"
        }
      }
    ],
    "remote": [
      {
        "type": "openstack_user"
      },
      {
        "type": "openstack_roles",
        "any_one_of": [
          "heat_stack_owner"
        ]
      }
    ]
  }
]
EOF
$ openstack mapping set mapping-for-k2k-federation --rules federated_heat_stack_owner_mapping.json
You’ll need to use a workaround for the trust delegation by assigning the heat_stack_owner role to the user directly. This is the user that is created during federated log in. The user’s domain is federated, and it could have the value of None (Federation=None).
$ openstack user list
The federated user should have a domain of None: openstack user show <federated user>
Here we require the user ID:
$ openstack role add heat_stack_owner --user <federated user ID> --project <project>
A known issue is that a federated user is presented with the option to change their password in the settings page. They will not be able to change their password.
Also, please note that federated users should not create local users. Federated admins may not be able to change a local user’s password.