User's Guide to Cloud Images (IBM Bluemix Private Cloud with Red Hat)
IBM Bluemix Private Cloud with Red Hat comes pre-populated with Cirros 0.3.3 x86_64 images.
You can check the Cloud Image Release Notes for more details about the images provided by IBM.
To work with Red Hat guest images, you can download the image files from the following URLs:
More information about using images with OpenStack is available on the OpenStack website: https://docs.openstack.org/image-guide/
Pre-requisites
If you are planning to use the command line (CLI) tools, be sure that you have the OpenStack Glance Client installed. You can find installation instructions in our knowledge base: Getting started with the OpenStack API.
In the current release of IBM Bluemix Private Cloud with Red Hat, you can upload an image file either through the command line or from the Horizon dashboard. Uploading through an image location or URL is not supported.
Select from alternative cloud images provided by IBM Bluemix Private Cloud
The IBM Bluemix Private Cloud with Red Hat in this release comes pre-populated with Cirros 0.3.3 x86_64 images. Additional cloud images are available, provided as a customer courtesy by IBM Bluemix Private Cloud.
- CentOS 6.8 x86_64
- CentOS 7.3 x86_64
- Ubuntu Server 14.04 LTS x86_64
- Ubuntu Server 16.04 LTS x86_64
- Windows Server 2008 R2 SP1 Datacenter
- Windows Server 2008 R2 SP1 Enterprise
- Windows Server 2008 R2 SP1 Standard
- Windows Server 2012 R2 Datacenter
- Windows Server 2012 R2 Standard
Upload an image to the Glance repository
You may upload and install separately-acquired operating system software, for example, Red Hat Enterprise Linux 7 KVM Guest Image, or you may provision any of the operating system images that we make available to you as a virtual machine instance. You are responsible to comply with all applicable operating system license terms and to acquire proper entitlements for each virtual machine instance.
Get IBM provided cloud image downloads from Box Panel
-
Log into Box Panel with Box Panel credentials. The Cloud Images page in Box Panel is available if you have at least one cloud, and if you are either a Primary or Technical customer contact.
-
From the Box Panel Dashboard, click on Services and select Cloud Images.
-
The Cloud Images page will appear. Each image is displayed as a card.
-
Click on the card that displays the image of interest to you. A modal window will pop up that contains your tempURL.
-
The tempURL displayed will be valid for next 24 hours so you can download the cloud image.
-
Be sure that the tempUrl token is escaped or specified in quotes. For example:
curl -f -o <output_file> '<cloud_image_download_tempUrl>' curl -f -o ubuntu-guest-image-14.04-20160301-x86_64.qcow2 'https://dal05.objectstorage.softlayer.net/v1/AUTH_2201d7be-5d96-431c-9bd0-ec3ed5b62b19/cloud_images/test/ubuntu-guest-image-14.04-20160301-x86_64.qcow2?temp_url_sig=9e9678ad2d81489cebd032dff2332ec8ee50ebba&temp_url_expires=1458956867' -
Download .qcow2 and .md5sum files of the image.
-
Download the .qcow2 image file and .md5sum checksum file using the tempURL and put these 2 files under the same folder. For example:
ubuntu-guest-image-14.04-20160301-x86_64.qcow2 ubuntu-guest-image-14.04-20160301-x86_64.md5sum -
Verify the downloaded .qcow2 image file using the .md5sum checksum file. For example:
md5sum -c ubuntu-guest-image-14.04-20160301-x86_64.md5sum ubuntu-guest-image-14.04-20160301-x86_64.qcow2: OK -
If the result returns “OK”, the downloaded qcow2 image is valid.
Upload an image using the command line
You can upload images through the Glance client. See Installing OpenStack Clients for more information.
Create an image.
- For Linux Images, use
-- min-disk 5 --min-ram 512 -
For Windows Images, use
--min-disk 30 --min-ram 2048$ glance image-create --os-version <os_version> --name <image_name> --min-disk <min-disk> --min-ram <min-ram> --disk-format qcow2 --container-format bare --file <image_file>
Check whether the image was created successfully. The image is queued for upload. It might take some time before the status changes from “Queued” to “Active.”
$ glance image-show <image-id>
See Glance command-line client for more informaton about this command.
Upload an image using the OpenStack dashboard
-
Log in to the IBM Bluemix Private Cloud OpenStack dashboard.
-
Under the Project panel, expand Compute and click Images.
-
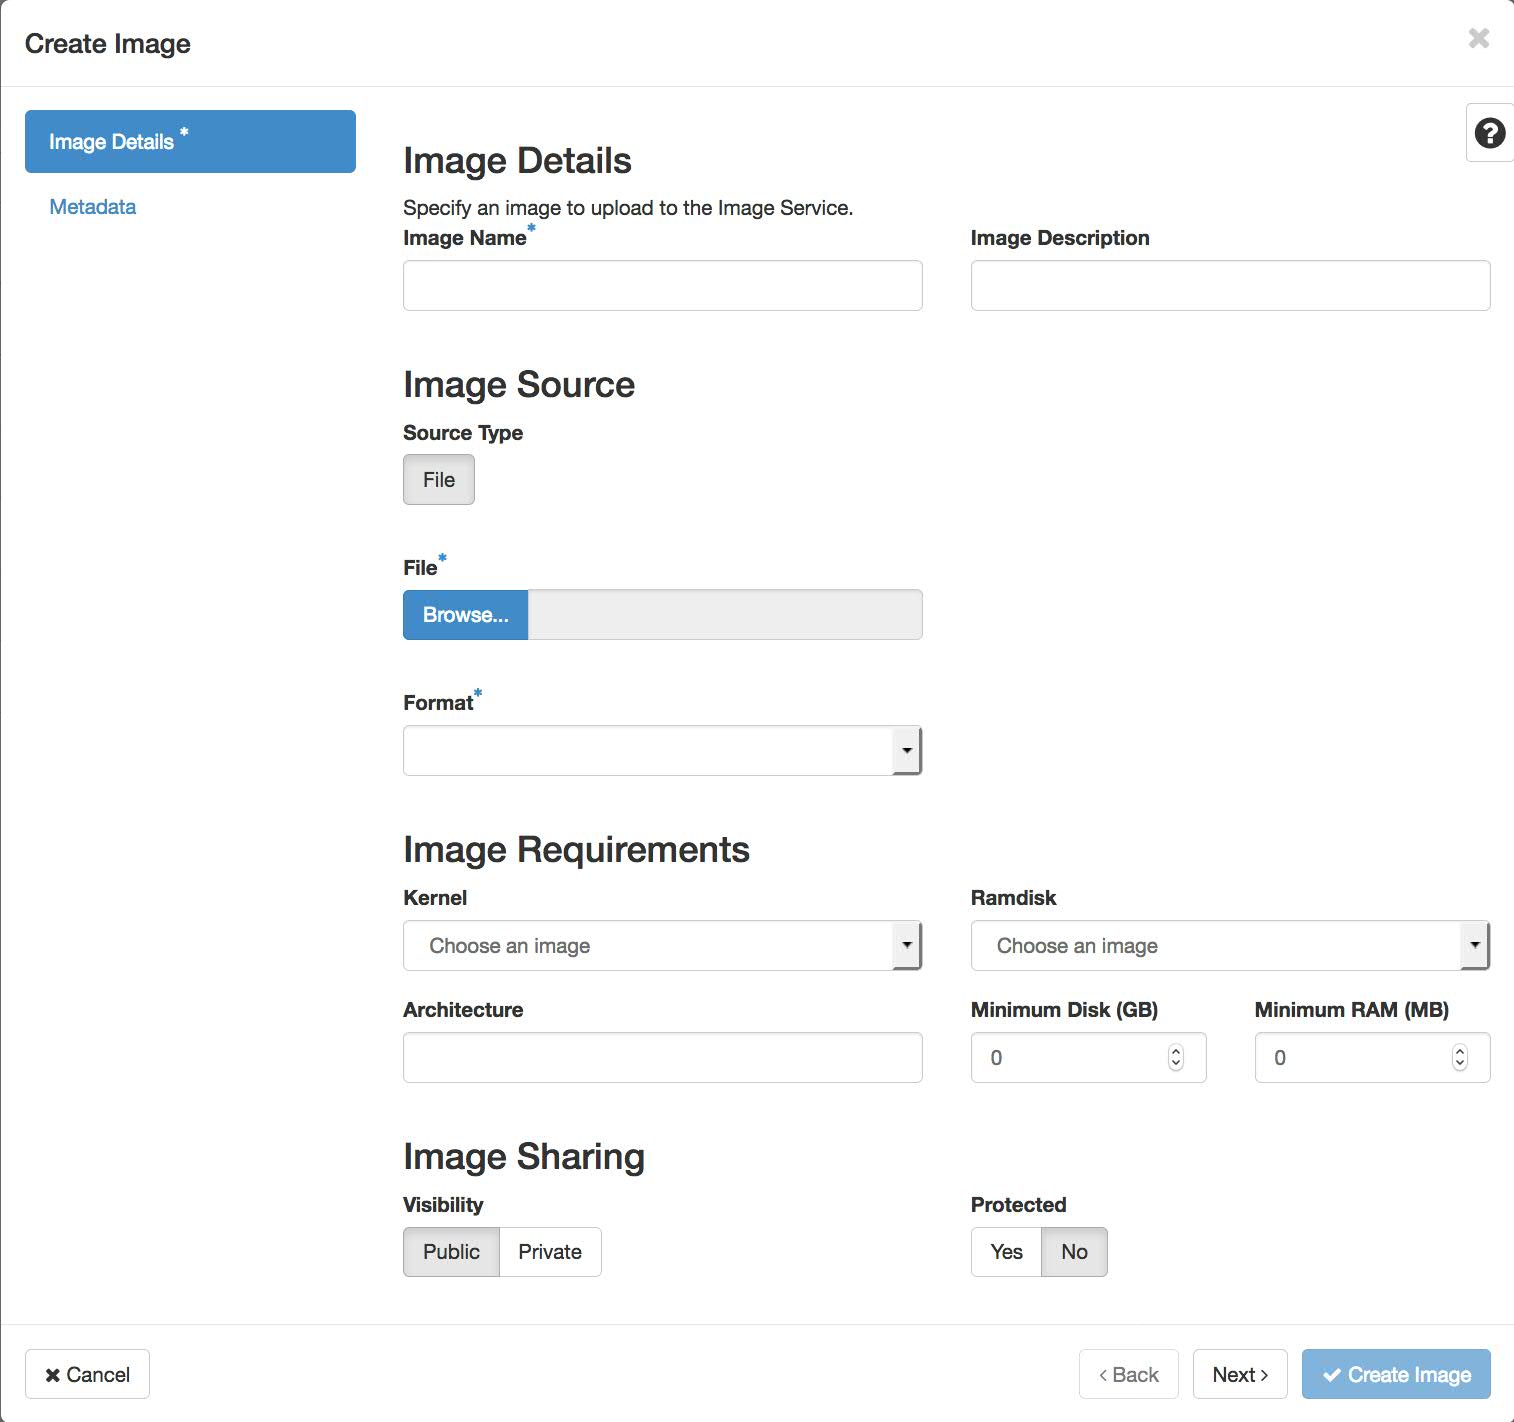
Click Create Image in the page. Specify the following parameters in the new page, and check Create Image.
Item Description Name Enter a name for the image. Description Optionally, enter a brief description of the image. File Choose Image File. Format Select the correct format (for example, QCOW2) for the image.Kernel Optionally, specify the kernel ID of the image stored in Glace that should be used as the kernel when booting an AMI-style image. Ramdisk Optionally, specify the ID of image stored in Glance that should be used as the kernel when booting an AMI-style image. Architecture Optionally, specify the architecture (for example, i386for a 32-bit architecture orx86_64for a 64-bit architecture).Minimum Disk(GB) For Linux Image, use 5; For Windows Image, use 30 Minimum RAM(MB) For Linux Image, use 512; For Windows Image, use 2048 Public Select this check box to make the image public to all users on all projects. Protected Select this check box to ensure that only users with permissions can delete the image. For example:
Name: Ubuntu Server 14.04 LTS x86_64 - 20160301 Description: Ubuntu Server 14.04 LTS x86_64 cloud image released on 2016/03/01 File: C:\Documents\ubuntu-guest-image-14.04-20160301-x86_64.qcow2 Format: QCOW2 - QEMU Emulator Architecture: x86_64 Minimum Disk(GB): 5 Minimum RAM(MB): 512 Public: True -
Check that the created image appears in the image list. The image is queued for upload. It might take some time before the status changes from “Queued” to “Active.”