Using Heat for autoscaling
OpenStack provides autoscaling features through Heat. This feature reduces the need to manually provision instance capacities in advance. You can use Heat resources to detect when a Ceilometer alarm triggers and provision or de-provision a new VM depending on the trigger. These groups of VMs must be under a load balancer which distributes the load among the VMs on the scaling group.
Whether you are running one instance or thousands, you can use autoscaling to detect, increase, decrease, and replace instances without manual intervention.
In the following examples, the following two policies are defined:
- When the CPU utilization rate is above 50%, a new instance is created automatically until the number of instances reaches six.
- When any CPU utilization rate is below 15%, an instance is terminated until the number of instances reaches one.
Creating stacks
- Download the simple scale file.
- Log on to the Horizon dashboard with the heat_stack_owner role.
- Click Project -> Orchestration -> Stacks.
- Click Launch Stack.
- On the Select Template page, click Choose File and select the simple scale file on your local machine.
- Update the image ID, network ID, key pair name, and security group ID based on your cloud instance.
- Click Launch.
Monitoring stacks
- Log on to the Horizon dashboard with the heat_stack_owner role.
- Click Project -> Instance and find the instance created as part of the stack.
- Connect to the instance with SSH connection tools such as Putty.
- Run the
topcommand to check CPU utilization rate. The utilization rate consumed by the dd process should be at least 99%. This triggers the CPU high utilization alarm. - Wait approximately ten minutes and verify that a new instance is created as part of the stack.
- Log in to both instances, find the dd process, and terminate it. This triggers the CPU low utilization alarm.
- Wait approximately ten minutes and verify that one of the instance is terminated and only one remains.
Removing stacks
- Log on to the Horizon dashboard with the heat_stack_owner role.
- Click Project -> Orchestration -> Stacks.
- Select the stack that you want to remove and click Delete.
An example of deploying a WordPress stack
You can find an auto-scaling example template for Heat on the official OpenStack Github repository. The following example uses a similar template based on the official one, which uses a snapshot of a VM with WordPress already installed and configured over an Ubuntu operating system as a base image.
You need the following parameters:
parameters:
  image:
    type: string
    description: Image used for servers
    default: "your image ID"
  key:
    type: string
    description: SSH key to connect to the servers
    default:  "your ssh ID"
  flavor:
    type: string
    description: flavor used by the web servers
    default: m1.small
  network:
    type: string
    description: Network used by the server
    default:  "your private network ID"
  subnet_id:
    type: string
    description: subnet on which the load balancer will be located
    default:  "your subnet ID on the private network"
  external_network_id:
    type: string
    description: UUID of a Neutron external network
    default:  "your public network ID"
resources:
The first resource you will provision is the health monitor configuration that will check the VMs under the load balancer. If the VM is down, the load balancer will not send traffic to it. Create the pool using the health monitor and specifying the protocol, the network and subnet, the algorithm to use for distributing the traffic, and the port that will receive the traffic on the virtual IP. Finally, create the load balancer using this pool.
- Create the health monitor, pool, and load balancer:
monitor:
  type: OS::Neutron::LBaaS::HealthMonitor
  properties:
    delay: 3
    type: PING
    timeout: 3
    max_retries: 3
    pool: { get_resource: pool }

pool:
  type: OS::Neutron::LBaaS::Pool
  properties:
    lb_algorithm: ROUND_ROBIN
    protocol: HTTP
    listener: { get_resource: listener }

listener:
  type: OS::Neutron::LBaaS::Listener
  properties:
    loadbalancer: { get_resource: lb }
    protocol: HTTP
    protocol_port: 80

lb:
  type: OS::Neutron::LBaaS::LoadBalancer
  properties:
vip_subnet: { get_param: subnet_id }- Associate a public IP for the load balancer so that it can be accessed from the Internet. Use the following syntax to create a floating IP for the load balancer:
lb_floating:
  type: OS::Neutron::FloatingIP
  properties:
    floating_network_id: {get_param: external_network_id}
port_id: {get_attr: [lb, vip_port_id]}- Use the following syntax to create the auto-scaling group (VMs):
asg:
    type: OS::Heat::AutoScalingGroup
    properties:
      min_size: 1
      max_size: 3
      resource:
        type: lb_server.yaml
        properties:
          flavor: {get_param: flavor}
          image: {get_param: image}
          key_name: {get_param: key}
          network: {get_param: network}
          pool_id: {get_resource: pool}
          metadata: {"metering.stack": {get_param: "OS::stack_id"}}
          subnet: {get_param:  subnet_id}
          user_data:
            str_replace:
              template: |
                #!/bin/bash -v
                sudo mysql -uroot -p"password" <<EOF
                use wordpress;
                update wp_options set option_value='http://$ip/wordpress' where option_id = 2;
                update wp_options set option_value='http://$ip/wordpress' where option_id = 1;
                EOF

              params:
                $ip:  { get_attr: [lb_floating, floating_ip_address] }
Use a Heat specific resource to define the scaling group: size and image that will be used to scale. You must make some changes on the database as every time the saved image is initialized, the public IP must be updated on the database. Use the user data to do this. See another file lb_server.yaml.
- Using specific Heat resources, define both up and down scaling policies. Use the following syntax to create scaling policies:
web_server_scaleup_policy:
    type: OS::Heat::ScalingPolicy
    properties:
      adjustment_type: change_in_capacity
      auto_scaling_group_id: {get_resource: asg}
      cooldown: 60
      scaling_adjustment: 1
web_server_scaledown_policy:
    type: OS::Heat::ScalingPolicy
    properties:
      adjustment_type: change_in_capacity
      auto_scaling_group_id: {get_resource: asg}
      cooldown: 60
scaling_adjustment: -1- Use Ceilometer to establish the alarms (both high and low) for the auto-scaling group for a specific metric. Use the following syntax to create Ceilometer alarms:
 cpu_alarm_high:
    type: OS::Ceilometer::Alarm
    properties:
      description: Scale-up if the average CPU > 50% for 1 minute
      meter_name: cpu_util
      statistic: avg
      period: 60
      evaluation_periods: 1
      threshold: 50
      alarm_actions:
        - {get_attr: [web_server_scaleup_policy, alarm_url]}
      matching_metadata: {'metadata.user_metadata.stack': {get_param: "OS::stack_id"}}
      comparison_operator: gt
  cpu_alarm_low:
    type: OS::Ceilometer::Alarm
    properties:
      description: Scale-down if the average CPU < 15% for 10 minutes
      meter_name: cpu_util
      statistic: avg
      period: 600
      evaluation_periods: 1
      threshold: 15
      alarm_actions:
        - {get_attr: [web_server_scaledown_policy, alarm_url]}
      matching_metadata: {'metadata.user_metadata.stack': {get_param: "OS::stack_id"}}
      comparison_operator: lt
In the lb_server.yaml file, define the image to initialize each time that the alarm triggers. These are the parameters that will be filled from the original template (the official one):
parameters:
  image:
    type: string
    description: Image used for servers
  key_name:
    type: string
    description: SSH key to connect to the servers
  flavor:
    type: string
    description: flavor used by the servers
  pool_id:
    type: string
    description: Pool to contact
  user_data:
    type: string
    description: Server user_data
  metadata:
    type: json
  network:
    type: string
    description: Network used by the server
  subnet:
    type: string
    description: subnet on which server will be located
default: "your subnet ID on the private network"- The first resource is the Nova server that you will initialize from a specific image. In our example, this is Ubuntu 14.04 with WordPress already installed and configured:
resources:
  server:
    type: OS::Nova::Server
    properties:
      flavor: {get_param: flavor}
      image: {get_param: image}
      key_name: {get_param: key_name}
      metadata: {get_param: metadata}
      user_data: {get_param: user_data}
      user_data_format: RAW
networks: [{network: {get_param: network} }]- The last resource for this template is a pool member in Neutron that will add the IP of the new server that was initialized to the pool on the load balancer:
member:
    type: OS::Neutron::LBaaS::PoolMember
    properties:
      pool: {get_param: pool_id}
      address: {get_attr: [server, first_address]}
      protocol_port: 80
      subnet: { get_param: subnet }
Process diagrams
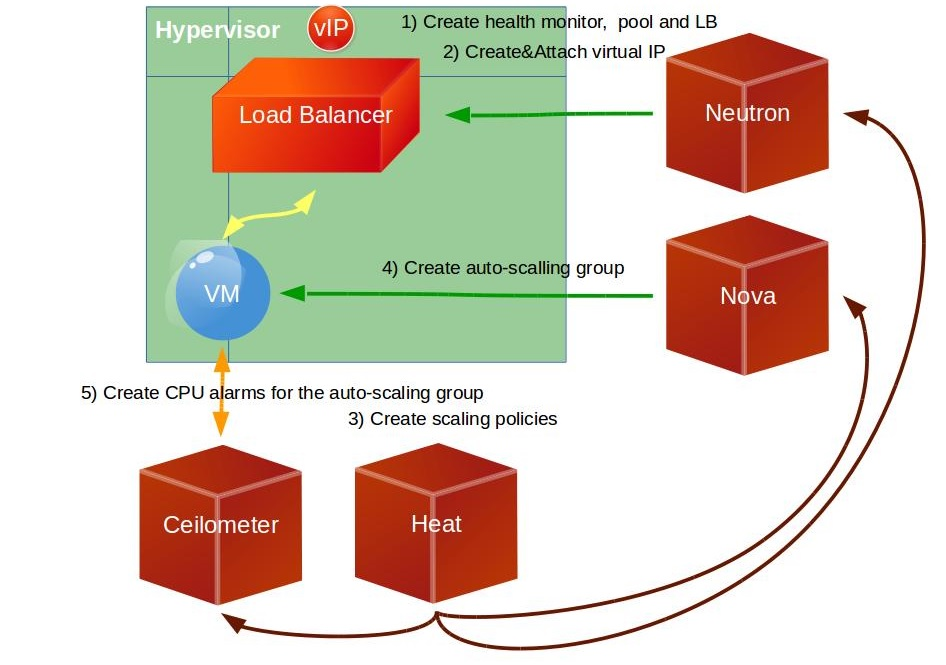
The following diagram shows the process when you launch the Heat stack:
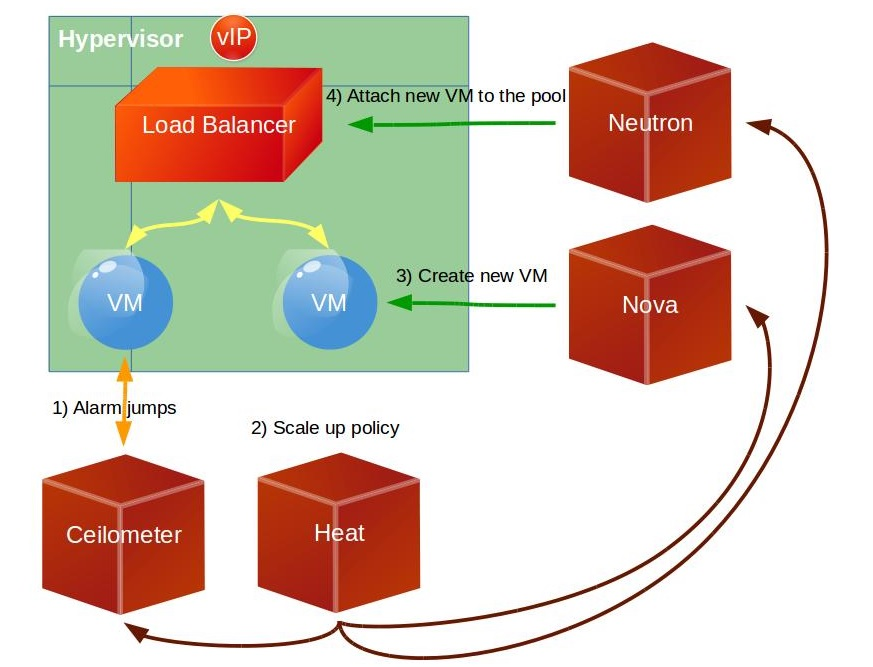
When the VM reaches the high CPU load limit that you set, the alarm in Ceilometer triggers and a new VM is initialized. This diagram shows the process:
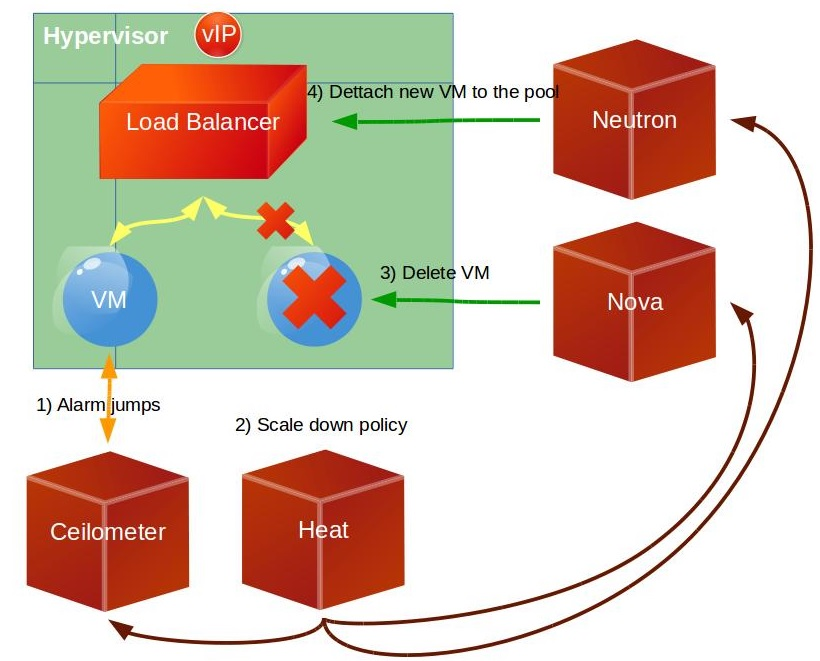
The same process occurs when a VM reaches the low CPU load limit as shown in this diagram: