

Building Up to OpenStack III -- Xen and libvirt
Republished from blog post by Dustin Lundquist and Leslie Lundquist
In the first article of our Building Up to OpenStack series, we looked at qemu and KVM, and their roles in the nucleus of any OpenStack cloud. In this article, we will look at Xen, another hypervisor that can work well with qemu. It offers an alternative to KVM. We’ll also look at libvirt, a helpful abstraction layer for your OpenStack cloud, and the basis for OpenStack Nova.
Today, IBM Bluemix Private Cloud and many other OpenStack-based cloud implementations utilize KVM (which has come to be nearly synonymous with qemu). In principle, however, these two types of hypervisors—qemu and Xen—are interchangeable, with certain modifications, because of libvirt.
At a certain time in the market, it was unclear whether KVM or Xen would dominate as a hypervisor—rather like the battle between VHS and Beta videotape devices. Therefore, Red Hat created libvirt to hedge its bets between KVM and Xen. The ‘libvirt’ abstraction provides API bindings for the purpose of manipulating VMs. Over time, libvirt has become a well-integrated part of the OpenStack cloud model.
libvirt sits on top of your hypervisor

Here’s what you need to know about Xen
Xen differs from KVM mainly in that the host operating system (OS), such as Linux, also runs as a VM under the Xen hypervisor. The Xen hypervisor only virtualizes CPU and memory, and, like qemu, Xen can provide pass through to I/O devices, as discussed in our previous article, Improving Cloud Performance, which was the second blog of this series.
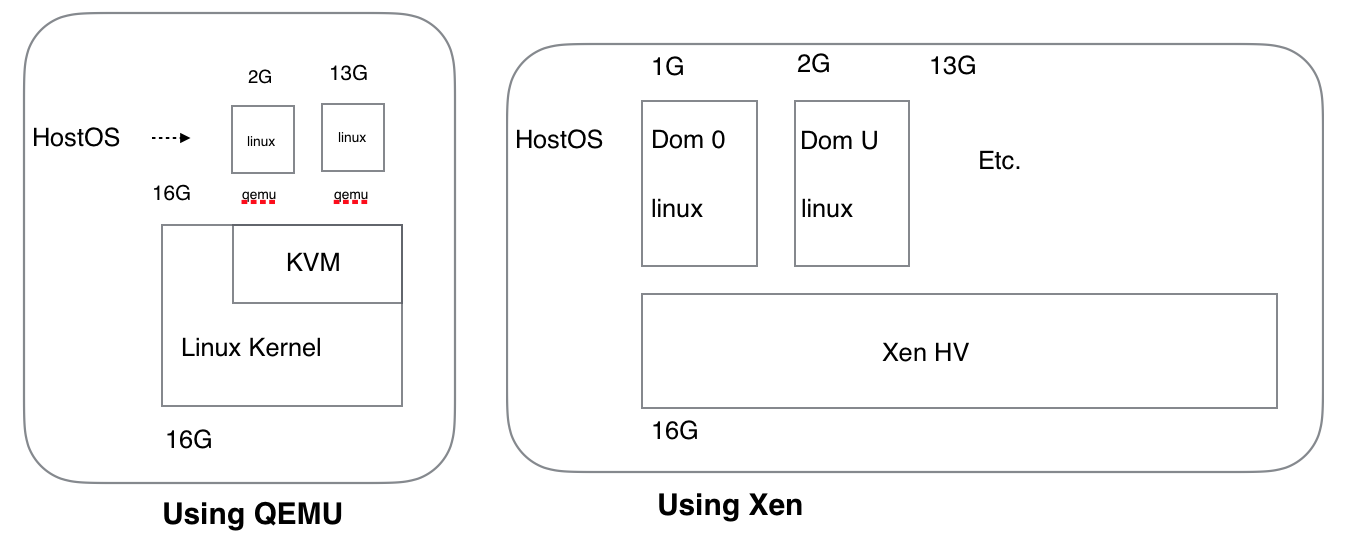
As the previous schematic figure illustrates, this architecture of Xen contrasts directly with the QEMU + KVM cloud model, which we explored in a previous article.
Here’s what you need to know about libvirt: Three ways that libvirt builds you a cloud
First, libvirt addresses the problem of storing the configuration of each VM—because memory, network, and specific disks, are connected to each VM, which is important to multi-tenancy. Also, it stores information regarding which VMs are running on each hypervisor, which is important in case of a reboot or failure.
Next, Libvirt supports KVM as a persistence layer: When KVM was introduced, it used the qemu model, in which you run a VM by specifying configuration on the command line, and—most important—there wasn’t a persistent way of storing the configuration. When Red Hat developed libvirt, it became the default VM configuration persistence layer for KVM. (It draws out the VM configuration from the actual data stored on the disk that is attached to the VM.) That is a good reason for using libvirt. Otherwise, with KVM, you have specify each VM from the command line. In contrast, Xen has its own configuration file format for each VM.
The last thing you need to know about libvirt is that it originally provided functionality for only a single-tenant cloud, not the multi-tenant cloud you are accustomed to using now. But here’s the connection: OpenStack Nova started just as a wrapper for libvirt and it is heavily influenced by libvirt models. Nova was the original OpenStack project, as we’ve discussed in another blog, but you could think of Nova as “multi-tenant libvirt.” In modern cloud solutions, it is OpenStack that provides security and multi-tenancy, while running atop qemu, KVM, or Xen, and libvirt.
Do you still need to choose between KVM or Xen?
With OpenStack now, libvirt, qemu, KVM, and Xen are “buried” in the cloud, under layers of abstraction and functionality, so there is really no difference in the cloud performance or functionality perceived by customers. Without libvirt, the choice between using KVM and Xen in the cloud originally was related to the tradeoffs between testability versus production reliability. Qemu was created more for testing. Remember that qemu began as an emulator, so it was not designed with a need to start VMs rapidly on boot or to make sure that the VMs remain after a reboot. Xen was designed as a hypervisor, but it originally required a lot of specializations that limited its usefulness.
Comparing Xen and KVM — libvirt talks to both!
Historically, Xen required a modified guest operating system—a special version of the Linux kernel. It accomplished its functionality by utilizing unused CPU privilege levels on the host node. (That is, for example, rings 0-3 exist on x86, but only 0 and 3 normally are used.) Later, Xen was modified to use CPU virtualization extensions, thus enabling the use of unmodified (ordinary) guest operating systems, which was a great step forward in the marketplace because it gave customers more choices.
KVM or Xen, what’s the big deal?
Actually, people used Xen for running virtual servers before they used qemu, because qemu was so slow that it wasn’t practical before the introduction of KVM made it so much faster. Xen–with its paravirtulized ability to run guest kernels–could run at near-native performance since its early days. For example, another large and successful cloud provider (naming no names) originally began by offering Xen, paravirtualized on guest VMs.
It is worth noting that only the kernel needs to be modified (recompiled) for Xen paravirtualization; therefore, the rest of the programs inside your VM could operate exactly the same as if they were running on bare metal…that’s what makes Xen feasible. It wouldn’t have taken off in the market if you had to recompile everything for it!
Finally, your modern OpenStack cloud : (qemu + KVM) or Xen + libvirt = Cloud
Now you know more about how the early days of cloud began. Your OpenStack cloud still operates with these fundamental elements: qemu with KVM, or Xen, and libvirt. Both of these hypervisors can utilize libvirt. From this basis, OpenStack Nova was modeled on libvirt, adding multi-tenancy.
Machines run a lot faster now, so even the additional overhead required for OpenStack allows production-level performance, with secure multi-tenancy! Aren’t you glad? We hope you’ve enjoyed our three-part series on understanding the basics, looking under the hood, of OpenStack cloud. You can learn more about IBM Bluemix Private Cloud, powered by OpenStack, at https://www.ibm.com/cloud-computing/bluemix/bluemix-private-cloud.