Box Panel User Guide
Getting Started with Box Panel
The Box Panel interface gives you a single, consolidated view of assets deployed in your IBM Bluemix Private Cloud and IBM Bluemix Private Cloud Local environments. Its self-service access lets you create support tickets, leverage central authentication for logins and user permissions, monitor various functions, and view your invoices, easily.
This user guide gives you an end-to-end overview, so you can get started using Box Panel to monitor and control your IBM Bluemix Cloud environment. This document applies to Box Panel Version 3.8.3 and later.
Table of Contents
- Logging In
- Getting Your Credentials From Lockbox
- Navigating the Box Panel Dashboard
- Managing Your Contacts
- Working with Cloud Images
- Help Documentation
- Getting Support
- Managing Billing
Logging In
To get started with Box Panel, log in.
- Go to the URL
https://boxpanel.bluebox.netto be directed to the login page. - Log into your Box Panel account with the login credentials provided by the IBM Bluemix Private Cloud Support Team. If you are a Secondary contact and you don’t yet have access, you can be added by an Administrator. See the Managing Users and Projects section for more details.
- If you do not yet have a Box Panel account, please refer to the Billing section for instructions on how to get an account.
- After logging in, you’ll be directed automatically to the Box Panel Dashboard.
Getting Your Credentials From Lockbox
Initially, you will receive cloud_admin credentials for your private cloud (OpenStack cluster) through the Box Panel Lockbox. Your credentials should look like this:
URL: https://customer_name.openstack.blueboxgrid.com

User name: **Your Specified Username**

Password: **Your Specified Password**
To get started, first navigate to the URL provided in your Lockbox. Then you can use Your Specified Username and Your Specified Password to log in.
Navigating the Box Panel Dashboard
From the Box Panel Dashboard, you can see a consolidated asset view of all of your IBM Bluemix Private Cloud and IBM Bluemix Private Cloud Local instances, on one screen.
The top of the Dashboard displays the infrastructure currently in use, with your list of hosts.

On the right, additional details related to your account summary are displayed, including your Lock Box Messages, Verbal Password, Bandwidth Quota, and Backup Quota.
On the upper right, you can view the following tabs and menu options.

Tabs:
- Support: To view existing tickets and create new tickets. See Getting Support for more information.
- Chat: To have a live chat with IBM Bluemix Private Cloud support staff. See the “Using the Chat Feature to chat with Bluemix Private Cloud Support” section in Getting Support.
- Webmail: To use the webmail hosted on https://mail.blueboxgrid.com/.
- Me: To view or update your profile, or change your password.
Menus:
- Switch accounts: If you have access to multiple IBM Bluemix Private Cloud instances, you can use this option to switch to another account.
- Accounts: View your account contacts, lock box messages, billing information, escalation procedure, and your account information.
- Services: View all the Blue Box Cloud and Managed Hosting services that are available to your account, including Servers, Cloud Images, DNS, Bandwidth Graphs, Bandwidth Data, and New Relic. The options may differ for different types of customers.
- Docs: View the help documentation. See Help Documentation for more information.
Managing Your Contacts
To view and update your customer contact information in Box Panel, do the following steps:
- Log into Box Panel.
- From the Account menu, choose Account Contacts to open the Account Contacts page.
-
All contacts authorized to access your account are listed under the Authorized Contacts section. Each person’s name and e-mail address are listed, along with three contact roles (note that a contact can have one or more of these contact roles):
- Admin (A) contacts can order or remove services, and also manage other contacts
- Billing (B) contacts can view and pay invoices
- Technical (T) contacts can open tickets and contact the Bluemix Private Cloud Support team for assistance
- Primary (P) contact. This one person (only one) retains administrative control over the account. The Primary Contact may only be changed by IBM Bluemix Private Cloud support staff.
To add a new contact, click the Add Contact button. The Add a Contact form will display, allowing you to enter the contact’s name, email address, telephone number and which role(s) the contact should belong to. When done, click the Save Details button to add the contact.
To remove an existing contact, click the X on the row with their name in the Authorized Contacts list.
Notice that the Primary Contact cannot be removed. Please contact IBM Bluemix Private Cloud support for assistance in modifying the Primary Contact.
Working with Cloud Images
The Cloud Images page in Box Panel is available to customers who have at least one cloud, and who are either a Primary or a Technical customer contact. If you qualify as a user, the Services navigation will include a Cloud Images link with access to the page.

Each image is displayed as a card. Cards are grouped by operating system.
To download a Cloud Image:
- Hover over the card associated with the image you would like to download.
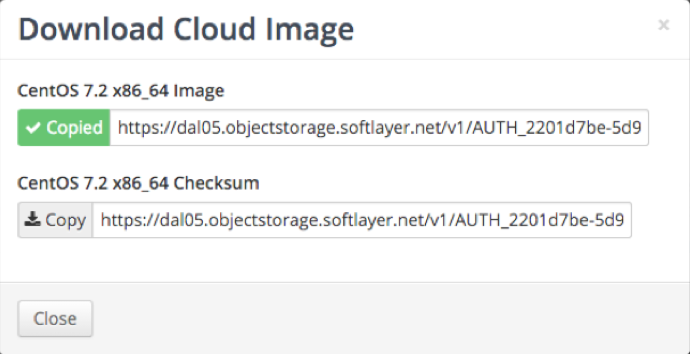
- Click the card. This click opens a modal window containing download links to the image and Checksum.
- Click the Copy button to the left of the Image URL. This click adds the URL to your clipboard.
- This procedure also can be accomplished using OpenStack APIs. For instructions, please see the main document about Cloud Images

Finding the Help Documentation
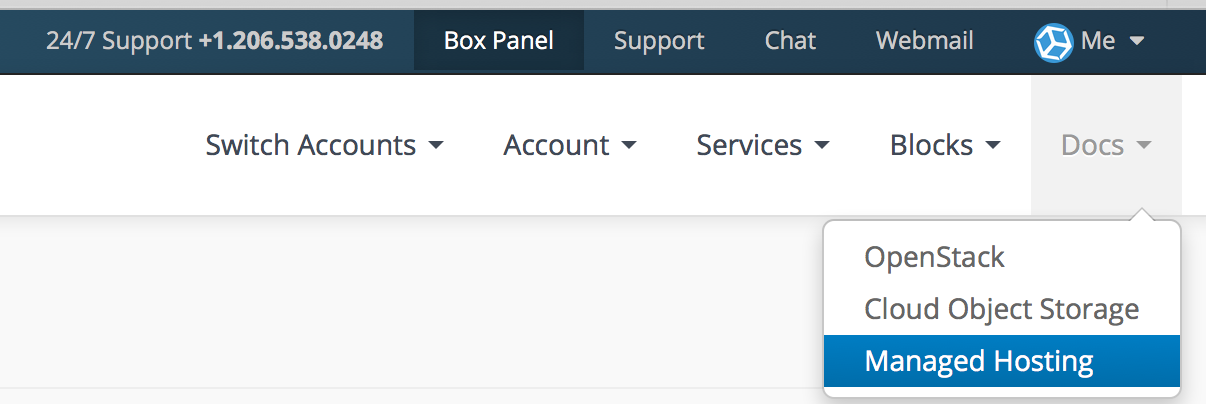
From your Box Panel dashboard, you’ll see a link on the Nav Bar (the rightmost link) called Docs. If you select that link, a Dropdown menu appears, with the options of OpenStack, Cloud Object Storage, or Managed Hosting. To view the Customer Help documentation for IBM Bluemix Private Cloud, select OpenStack. The Help page will appear. You can browse the documentation by category, or you can search, using the search bar. By hovering over one of the icons, you can see a list of articles within that topic area.

Getting Support
Note: For immediate support, you can call Bluemix Private Cloud Support at 1-800-613-4305 or email us at support\at\bluebox/dot/net.
In most cases, you’ll want to open a support ticket to get support. By using a ticket, you’ll have a record of the issue and the solutions taken to address your issue, complete with logs of your chat sessions with the customer support team.
To create a ticket:
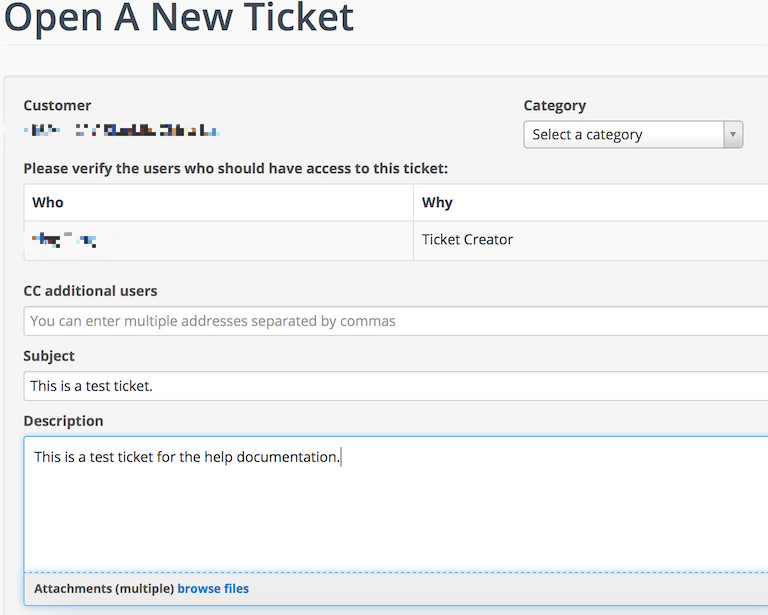
Step 1. Click New Ticket from the Support page.

Step 2. In the Modal window, your name should show up as the Ticket Creator.
Step 3. Select a category (Support or Billing). Verify the user list that should have access to your ticket.
Step 4. Copy additional users in the CC additional users field to make them aware of the ticket and track its status.
Step 5. Add a descriptive subject to the ticket.
Step 6. Collect and add all useful information to the Description section, such as:
- Date and time the issue began
- Frequency of the issue (permanent or constant, at a particular time of day, etc.)
- Steps you have taken to replicate the issue
- Affected server name(s)
- Affected data center(s)
- Any error messages returned
- Applicable server logs
- Any additional useful information
Step 7. Include attachments, such as log files, right below the Description section.
Step 8. If your deployment is for a new cloud, check the Deployment box.

Note: Steps 9 and 10 can be skipped for non-urgent concerns.
Step 9. If the issue is urgent, you can check the Open this Ticket as Urgent box to escalate the ticket. This click will prompt an acknowledgement that you consent to pay consulting charges if the issue is non-critical (critical items would include situations in which there are outages).
Step 10. If you wish to open your ticket as Urgent and consent to pay the consulting charges for non-critical items, check the I Agree box.
Step 11. Finally, click the Create Ticket box.
Using Your Support Ticket
Anytime after a ticket is created, you can see the text associated with that ticket, by clicking on that support ticket from your Dashboard. The ticket’s text may include references to other tickets, as well as chat history and any correspondence related to your selected ticket. The status of your support ticket is highlighted in the top right corner. Status indicators include OPEN, PENDING COMPLETION, PARKED, and so forth.

From the panel on the left-hand side of the screen, you can select options to create another new support ticket, subscribe to the ticket you have selected (if you want to follow its status), view your tickets, and view all tickets submitted by shared users on your account.
To view a list of Subscribers for a selected ticket, click on the Subscribers link.
To have a written conversation with one of our Bluemix Private Cloud support team experts about the topic of this ticket, you can click the green Post Reply button, or you can use the live Chat feature by clicking on Chat. All live chat sessions are recorded and added to the ticket as a transcript.
Using the Chat Feature to chat with Bluemix Private Cloud Support
- Click the Chat tab from your Dashboard. This action automatically directs you to a chat room with support staff.
- From here, you are able to view the support staff members join your conversation on the left-hand side of the chat room.
- Once a support member joins, you can compose and send messages from the chat bar. If you need to enter a new line during your chat, press Control/Command + Enter.
- If you need to escalate your support issue, please call 1-800-613-4305 ext 1.
Note: Each customer chat room is private. This means that only the contacts within your customer account and the Bluemix Private Cloud support staff have access to your transcript. No sensitive data (such as credit card numbers, or private keys) persists.
Managing Billing
To view your contracts and monthly billing reports, click the Account tab in the Box Panel Dashboard, then click the Billing tab.
For further billing support, please contact the IBM Support Team, and we will be happy to assist you.


